


Dull, gummed-up blades turn ordinary cutting jobs into frustrating battles against burning, tear-out, and motor strain. Learning how to remove circular saw blade assemblies safely keeps your workshop running efficiently and protects your cuts from messy edges. Whether you need to swap in a fine-finishing blade for smooth cabinet plywood or install a rugged framing blade for rough lumber, mastering quick blade removal is an essential skill for any woodworker or DIYer.
Many circular saw operators run into confusion over bolt rotation directions, stuck arbor nuts, or spindle locks that slip under pressure. Similar challenges often arise when tackling diverse jobsite materials, much like the setup questions discussed in our guide on cutting PVC with a power saw. Taking a methodical approach to power disconnection, tool holding, and thread loosening eliminates guesswork so you can swap blades quickly without damaging your saw.

Pros
- Arbor grips keep hands safely away from sharp carbide tips during rotation
- Raised ribs and molded fill indicator optimize liquid cleaner usage
- Lidded basin keeps solution contained and prevents workshop dust contamination
- Brass bristles remove stubborn pitch without damaging carbide brazing
Cons
- Cleaning solution concentrate must be purchased separately
- Basin size maxes out at 12-inch blades and cannot fit 14-inch specialty cutters
- Requires flat bench or shelf space for soaking and storage
The Rockler Saw Blade Cleaning Kit is a dedicated maintenance station built to strip gum, pitch, and baked-on wood resins from circular, miter, and table saw blades. Designed to handle blade sizes ranging from 6-1/4 inches to 12 inches, this setup simplifies what used to be a messy shop chore. Instead of soaking blades in shallow oil pans or haphazard five-gallon bucket lids, it provides an organized, self-contained washing basin tailored specifically for standard woodworking tooling.
This kit is an ideal match for cabinetmakers, custom woodworkers, trim carpenters, and serious DIY homeowners who rely heavily on clean, burn-free cuts. Over time, friction and heat cause wood sap to bake onto blade plates and teeth, resulting in ragged cuts, smoky workpieces, and unnecessary load on saw motors. Regular maintenance with this setup restores cutting efficiency, reduces feed resistance, and extends the time needed between expensive professional resharpening visits.
A standout safety feature is the pair of threaded plastic blade grips that lock through the blade arbor hole. These handles let you rotate and flip the blade inside the basin without placing bare fingers near sharp carbide teeth. The included scrubbing tool features a synthetic scouring pad for general plate surfaces on one side and a stiff brass wire brush on the other. The brass bristles work deep into gullets to break up stubborn pitch deposits without chipping delicate carbide edges or loosening the brazed joints.
The build quality of the basin centers on durable polycarbonate plastic that resists cracking and handles common citrus cleaners or dedicated pitch removers. Raised bottom ribs keep the blade elevated so cleaning solution can circulate freely on both sides, while molded fill lines prevent wasting expensive cleaning chemicals. Non-slip feet on the base keep the tray steady during aggressive scrubbing, and the fitted lid helps minimize evaporation while keeping sawdust out between uses.
A practical limitation is that the basin diameter is capped at 12 inches, so larger 14-inch chopsaw blades or oversized radial arm saw cutters will not fit. Additionally, woodworkers will need to supply their own cleaning chemical or concentrated pitch-stripping formula. For workshops running frequent rips and crosscuts through pitch-heavy pine, cherry, or resinous sheet goods, this kit provides a tidy, safe, and cost-effective way to keep valuable cutting tools performing at their best.
In daily workshop practice, pitch buildup creates extra drag that leads to blade deflection, inaccurate bevels, and charred edges on hardwoods. Using this dedicated cleaning kit allows woodworkers to refresh dull-acting blades in just a few minutes, proving that many blades merely need a thorough degreasing rather than immediate resharpening.
The lidded design adds considerable utility for busy garage and basement workshops where space is limited. By covering the basin during the soaking period, users prevent airborne sawdust from falling into the cleaning fluid, allowing the same batch of cleaner to be reused across multiple blades before disposal.
Pros
- Exceptional cut quality on plywood and veneer with minimal sanding required.
- Thin kerf reduces cutting resistance, extending battery life on cordless saws.
- Heat-reducing expansion slots help maintain blade integrity during heavy use.
- Affordable 3-pack offers great value for frequent users.
- Fits standard 5/8-inch arbor saws with easy installation.
Cons
- Not recommended for ripping thick hardwoods or framing lumber due to fine tooth count.
- May require more frequent sharpening on abrasive materials like cement board.
- No storage case included for the spare blades.
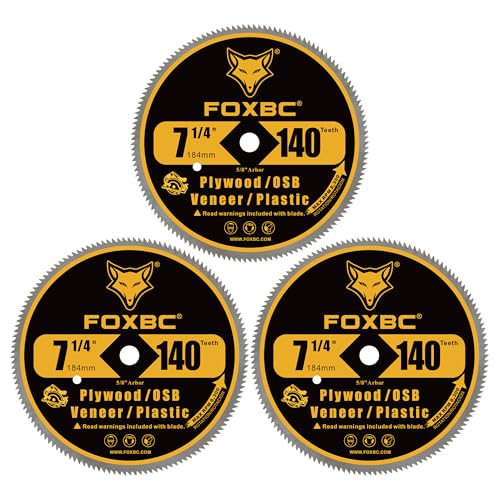
This FOXBC 7-1/4 inch circular saw blade set is designed specifically for fine finish work. With 140 precision-ground teeth and a thin kerf, it excels at making smooth, splinter-free cuts in plywood, OSB, plastic panels, veneer, and vinyl siding. Whether you're a DIY homeowner tackling a weekend project or a contractor installing cabinets and trim, these blades deliver clean edges that reduce the need for sanding and touch-ups.
Performance is where this blade set really shines. The high tooth count and thin kerf combine to produce fast, accurate cuts with minimal tear-out. Expansion slots help dissipate heat, preventing the blade from warping even during extended use. This makes it an excellent companion for cordless saws, as the reduced cutting resistance helps conserve battery power. Many woodworkers and finish carpenters will appreciate the consistent results from blade to blade.
Build quality is solid. Each blade is made from high-quality steel with precision-ground teeth that hold an edge well. The 5/8-inch diamond knockout arbor is a standard size that fits most circular saws, so installation is straightforward. While these blades aren't designed for heavy-duty ripping, they are built to last for plenty of finish cuts before needing sharpening.
Storage and maintenance are simple but require some planning. The 3-pack comes with three blades, but no case is included, so you'll need to store the extras carefully to avoid damage. Keeping them in a blade sleeve or drawer organizer works well. Cleaning pitch buildup occasionally will help maintain performance, but otherwise these blades are low-maintenance.
One realistic limitation is that these blades are not suited for cutting thick solid lumber or framing materials. The fine teeth can dull faster when used on abrasive materials like cement board or hard composites. However, for their intended purpose of cutting sheet goods and thin materials, they are an excellent choice. The affordable price of the 3-pack also makes it easy to keep a sharp blade on hand at all times.
Overall, this FOXBC blade set is a practical investment for anyone who regularly works with plywood, veneer, or plastic panels. DIYers will appreciate the clean results, and professionals will like the value and reliability. If you need a dedicated finish blade for your circular saw, this 3-pack delivers impressive performance without breaking the bank.

Pros
- Wide size range (22-50mm) for various cutting applications.
- HSS blades offer good durability and sharpness for soft materials.
- Multiple shank options ensure compatibility with most rotary tools and drills.
- Includes a screwdriver for easy blade changes.
- Compact and affordable kit for DIYers and hobbyists.
Cons
- Not suitable for cutting hard metals like steel or iron.
- Blades may wear quickly on abrasive materials.
- No storage case included; blades and shanks need separate organization.
The Auxiren 11 PCS Rotary Drill Saw Blades kit is a practical accessory set designed for cutting wood, PVC, plastic, and soft metals like aluminum and copper. It includes 6 high-speed steel (HSS) cutting wheels ranging from 22mm to 50mm, along with 4 shanks (two 1/4" hex, one 1/8" round, one 1/4" round) and a small screwdriver. This kit is best suited for DIY homeowners, woodworkers, hobbyists, and light workshop users who need a versatile cutting option for drills and rotary tools.
In terms of performance, the HSS blades maintain their sharpness reasonably well for soft materials, allowing for clean cuts in wood, PVC pipes, and thin sheet metal. The carbon steel shanks add durability and resist rust and wear over time. The maximum speed rating of 20,000 RPM helps ensure safe operation when used correctly. Users should note that these blades are not intended for hard metals like steel or iron, as doing so could damage the blades and pose a safety risk.
Build quality is adequate for the price point. The blades are made from HSS, which offers good edge retention for light-duty tasks. The shanks are robust enough to handle the torque of most electric drills and rotary tools. The included screwdriver simplifies blade changes, though the kit lacks a dedicated storage case, so you will need to keep the components organized separately.
Ease of use is a strong point. The multiple shank options mean the blades can be quickly swapped to fit different tools. Installation requires no specialized tools - just insert the appropriate shank and tighten. This makes the set convenient for on-the-go tasks like cutting PVC pipes in tight spaces or trimming plastic sheets in a garage workshop.
A realistic limitation is that the blades are not designed for heavy-duty or continuous use. They work best for occasional DIY projects and light workshop applications. Users cutting abrasive materials may experience faster wear. Additionally, the lack of a storage case means components can be misplaced if not stored carefully.
Overall, the Auxiren 11 PCS Rotary Drill Saw Blades kit offers good value for DIYers and hobbyists who need an affordable, versatile cutting solution for soft materials. It is a practical addition to any home toolbox or garage workshop, especially for tasks like cutting PVC pipes, crafting wood, or trimming thin metal sheets. Just remember to pair it with proper safety gear and avoid hard metals for the best results.
The Auxiren rotary saw blade kit uses high-speed steel for the cutting wheels, which provides decent sharpness and wear resistance for soft materials like wood, plastic, and soft metals. The shanks are made from carbon steel, offering good strength and corrosion resistance. The blades are precision-ground, though they are not intended for heavy-duty or industrial use. The included screwdriver feels basic but functional for blade changes. Overall, the build quality is appropriate for the price and intended DIY/light workshop applications.

Pros
- Affordable three-blade set covers most wood-cutting needs for DIY and professional use
- Strong carbide tips hold up well against abrasive materials like plywood and MDF
- Anti-kickback design adds a layer of safety during aggressive cuts
- Quieter operation compared to many budget blades thanks to noise-reducing slots
- Compatible with a wide range of popular saw brands
Cons
- Limited to wood and wood composites; not suitable for metal, masonry, or abrasive materials
- Some users may prefer a higher tooth count (80T+) for ultra-smooth finish cuts on delicate trim
- Blades may require occasional cleaning to prevent pitch buildup and maintain performance
The Revvstark 3-Pack 7-1/4 Circular Saw Blade Set is a practical, budget-friendly solution for anyone who regularly cuts wood. This combo includes three blades: a 24-tooth framing blade for fast ripping, a 40-tooth blade for general crosscutting and ripping, and a 60-tooth blade for cleaner finish cuts. Whether you're a DIY homeowner tackling weekend projects, a woodworker fine-tuning cabinet parts, or a contractor framing a deck, this set covers the basics without breaking the bank.
Performance-wise, these blades are designed for efficiency. The ultra-thin laser-cut kerf reduces drag and helps your saw motor run cooler, which is especially noticeable when cutting dense hardwood or thick plywood. The carbide-tipped teeth stay sharp through repeated use, and the anti-kickback teeth provide an extra layer of safety during aggressive cuts. Many users will appreciate the noise-reducing perforations and thermal expansion grooves, which help keep the blade running smoothly and quietly on the job site.
Build quality is solid for the price point. The blades are made from premium alloy steel with hardened tungsten carbide tips, and they resist bending and deflection well during straight cuts. The 5/8-inch arbor fits most popular circular saws, miter saws, and table saws from Dewalt, Craftsman, Ryobi, Milwaukee, and similar brands. Just keep in mind these are strictly for wood and wood-based materials like MDF, chipboard, plywood, and laminated panels. They are not designed for metal, masonry, or abrasive materials.
Storage is straightforward since the blades come in a simple plastic sleeve, but many users will want to keep them in a dedicated blade case or drawer to protect the teeth. Setup is as simple as swapping out your current blade, and maintenance involves occasional cleaning with a blade cleaner or resin remover to prevent pitch buildup. Overall, this set is easy to use and store, making it a convenient addition to any workshop or garage.
One realistic limitation is that the 60-tooth blade, while good for finish cuts, may not produce the ultra-smooth edge that an 80-tooth or higher blade would on delicate trim or veneered plywood. For most framing, shelving, and general carpentry, though, it performs admirably. If you need glass-smooth cuts for fine furniture or cabinetry, you might want to supplement with a dedicated high-count blade.
Based on product specifications and user feedback, this Revvstark set offers strong value for DIY homeowners, woodworkers, and contractors who want a versatile, affordable blade selection. It's a practical choice for anyone looking to upgrade their saw's capabilities without investing in multiple expensive single blades. If you frequently cut wood and want reliable performance with good safety features, this combo is worth considering.
Mastering Circular Saw Blade Removal, Maintenance, and Replacement
Removing a circular saw blade is a fundamental maintenance task that every power tool operator encounters regularly. While the mechanical process involves loosening only a single arbor bolt, doing the job incorrectly can strip threads, round off bolt heads, or cause severe hand lacerations. Taking the time to understand the mechanical design of your saw ensures smooth swaps, proper torque application, and reliable alignment every time you change accessories.
Circular saws exert significant rotational force through an arbor shaft, and manufacturers design arbor fasteners to resist backing out during heavy cutting. Because rotational momentum varies depending on whether you operate a standard sidewinder or a worm-drive saw, thread orientation can vary across models. Knowing how your specific tool functions before reaching for a wrench prevents accidental overtightening when you intend to loosen the hardware.
Essential Safety Preparations Before Touching the Arbor Bolt
Unintentional motor startup represents the single greatest risk during any blade change procedure. If your circular saw connects to mains power, immediately pull the cord from the wall outlet or extension lead before adjusting hardware. For cordless models, slide the battery pack completely off the foot or handle rather than relying on a trigger lock switch. A disconnected power source guarantees zero accidental blade rotation while your fingers remain near sharp carbide teeth.
Protective equipment remains just as important during bench maintenance as it does during active cutting. Heavy leather work gloves shield palms and knuckles from razor-sharp tooth tips if a wrench slips unexpectedly under high torque. Additionally, place the tool on a stable, flat workbench with adequate clearance for the lower blade guard to retract smoothly without binding against shop clutter.
Inspect your workspace for good overhead lighting and sweep away loose sawdust before setting the saw down. Clear sightlines help you inspect the arbor bolt hex socket, outer flange, and washer recess without squinting through debris. A clean, well-lit surface also makes it easy to keep loose washers and bolts organized as you remove them from the spindle.
Locating the Spindle Lock and Determining Thread Direction
Most modern handheld circular saws feature an integrated spindle lock button situated near the upper blade guard or motor housing. Depressing this spring-loaded lock pin engages an internal notch on the arbor gear, preventing the shaft and blade from spinning freely. Rotate the blade by hand with gloved fingers while pressing the button until you feel the pin seat firmly into place with an audible click.
Arbor thread orientation frequently causes confusion among DIYers and seasoned remodelers alike. As a universal operational rule, circular saw arbor bolts loosen in the same direction that the blade cuts. On standard sidewinder circular saws where the blade mounts on the right side of the motor, the blade spins counter-clockwise, meaning the bolt loosens by turning counter-clockwise with a standard right-hand thread.
Left-blade saws and many worm-drive units use reverse, left-handed threads where turning clockwise loosens the arbor fastener. Always inspect the directional arrow embossed on the outer blade guard or blade face for immediate clarification. Turning your wrench in the direction of that rotation arrow will consistently loosen the retaining bolt regardless of the specific gear configuration.
Step-by-Step Procedure for Removing the Circular Saw Blade
Begin by securing the saw body against your work surface with your non-dominant hand while keeping the lower guard retracted safely. Position the factory-supplied arbor wrench, an appropriately sized combination box wrench, or a matching hex key squarely onto the arbor fastener. Ensure the tool seats fully against the flats of the bolt head to prevent rounding the edges under firm downward pressure.
While maintaining firm pressure on the spindle lock button, push or pull the wrench in the loosening direction with a controlled, steady motion. Avoid jerking or striking the wrench handle with a mallet, as sudden shock can shear the spindle lock pin inside the motor housing. Once the initial thread friction breaks, the bolt should spin freely by hand without further resistance.
Unthread the arbor bolt completely and carefully set it aside alongside the outer clamping flange. Retract the lower spring-loaded guard fully into the upper housing using the plastic or metal lift lever. Tilt the old blade slightly outward from the baseplate opening, clearing the 5/8-inch arbor shoulder, and slide it down and away from the tool body.
Overcoming Stubborn, Rusted, or Over-Tightened Arbor Bolts
Over time, heat cycles, pitch buildup, and previous overtightening can cause an arbor bolt to seize tightly against the outer flange. When the internal spindle lock pin feels weak or threatens to slip under high torque, stop pushing immediately to avoid internal gear damage. Instead, clamp a scrap block of soft 2×4 lumber securely against the blade teeth to lock the rim mechanically without bending the plate.
Applying a small drop of penetrating oil directly around the bolt shoulder and letting it soak for ten minutes can break hardened pitch and light surface corrosion. If the bolt head is an internal hex drive, ensure the Allen key has crisp, sharp corners rather than worn edges that might slip. A closed box-end wrench offers significantly better contact and leverage than an adjustable open-end wrench when dealing with stubborn hardware.
For bolts that refuse to budge, resting the saw base firmly on the bench allows you to apply controlled leverage using your body weight. Keep your downward force aligned straight with the spindle axis so the wrench does not twist off the bolt head. Once the bolt cracks loose with a soft snap, back it out cleanly and wipe down the threads with a clean rag before proceeding.
Inspecting and Cleaning Flanges and Spindles Between Blade Swaps
Removing a dull blade presents the ideal opportunity to inspect the inner and outer clamping washers for wear and resin accumulation. Wood pitch, sawdust, and dried sap frequently cake inside the flange recesses, creating uneven clamping pressure that causes blade wobble and rough cuts. A clean arbor assembly guarantees true, square running and minimizes vibration across long rip cuts.
Dedicated cleaning systems such as the Rockler Saw Blade Cleaning Kit provide specialized scrubbing pads, brass brushes, and soaking dishes to dissolve baked-on resin safely. Cleaning your blades and clamping hardware removes pitch without dulling delicate carbide tips or scouring precision-machined steel flanges. Keeping mounting surfaces free of crusty debris also prevents arbor bolts from seizing during future blade changes.
Examine the inner flange where it keys onto the motor spindle to make sure it sits flat against the internal shoulder. If the inner flange has burrs, deep score marks, or distortion from previous blade slips, replacement is necessary to preserve cut accuracy. Wipe the bare spindle threads with a dry nylon brush to remove fine wood grit before seating a fresh cutting disc.
Selecting the Correct Replacement Blade for Your Project
Once the old blade is free, matching the replacement accessory to your specific cutting task determines the quality and speed of your work. Multi-blade collections like the 3 Pack 7 1/4 Circular Saw Blade 24T&40T&60T Combo offer versatile tooth counts ranging from fast 24-tooth framing blades to smooth 60-tooth finish blades. Choosing fewer teeth speeds through thick framing lumber, while higher tooth counts prevent splintering on delicate trim and furniture components.
When working with sensitive materials like thin plywood, melamine, or vinyl siding, high-density tooth configurations make a noticeable difference in edge quality. An accessory such as the FOXBC 7-1/4 Inch 140 Tooth Fine Finish Carbon blade uses 140 precision-ground teeth to slice through sheet goods without severe tear-out. Choosing thin-kerf options also reduces motor load, allowing cordless saws to cut longer on a single battery charge.
Small-scale specialty jobs may require unconventional cutting attachments rather than standard 7-1/4-inch circular saw blades. Kits like the 11 PCS Rotary Drill Saw Blades set provide miniature high-speed steel discs tailored for inside PVC pipe cuts and craft applications. If your upcoming tasks expand beyond traditional wood framing into dense metals, exploring techniques for cutting metal with a band saw can help you evaluate whether a circular saw or dedicated metal-cutting bandsaw suits the material better.
Installing the New Blade and Verifying Guard Operation
Installing your fresh blade requires careful attention to directional alignment and flange orientation. Retract the lower safety guard completely and slide the new blade through the foot plate opening onto the arbor shoulder. Verify that the printed rotation arrow on the blade face matches the directional arrow stamped on the saw guard, pointing teeth upward into the cut at the front of the shoe.
Slide the outer clamping flange onto the arbor, matching the flat sides of the spindle hole if your saw utilizes a keyed shaft design. Thread the arbor bolt into the spindle by hand, turning it opposite the cutting rotation until it seats flush against the outer washer. Engaging the threads fully by hand prevents costly cross-threading that could permanently ruin the saw arbor.
Depress the spindle lock button once more and tighten the arbor bolt firmly with your wrench until it is snug. Avoid over-torquing with cheater pipes or excessive muscle, as the natural cutting rotation of the saw helps maintain clamping tightness during operation. Finally, release the lower guard and let it swing closed, manually cycling it several times to confirm that it snaps back freely without rubbing against the new blade body.
Following a deliberate procedure when removing and reinstalling circular saw blades protects your hands, extends tool life, and guarantees clean, accurate results on every cut. By isolating power completely, using proper mechanical leverage, and keeping clamping surfaces immaculate, blade swaps become a fast and straightforward part of your workshop routine.






Write Your Review
No reviews yet. Be the first to share your experience!