


Installing baseboard shoe trim or quarter round moulding often provides the clean finishing touch that transforms an ordinary flooring installation into a polished space. Learning how to cut quarter round with miter saw equipment requires attention to delicate workpiece handling, exact angles, and consistent orientation against the fence. Because quarter round is narrow and flexible, standard rough-cutting practices often lead to shattered ends, uneven joints, and frustrating gaps along the baseboards. Proper blade selection, workpiece support, and deliberate measuring techniques help ensure crisp corner joints that fit tightly together without excessive caulk.
Many homeowners also discover that managing small wood or composite mouldings introduces unique safety and stability concerns on a high-powered electric miter table. If you frequently work with composite materials or light trim, reviewing cutting PVC moulding with a miter saw can give you valuable context on chip prevention and blade speeds. Modern finish carpenters also rely on dedicated manual miter shears alongside their stationary power saws for quick, dustless angle trims in tight spaces. Understanding both stationary power saw procedures and handy manual cutting alternatives gives you the versatility required for flawless, professional finish carpentry.

Pros
- Precise angle adjustment with clear scale for accurate cuts.
- Comfortable, non-slip grip reduces hand fatigue during extended use.
- Safety lock prevents accidental cuts and protects the blade.
- Includes two spare blades for added value and longer tool life.
- Lightweight and easy to handle for one-handed operation.
Cons
- Not suitable for cutting metal, hardwood, or dense plastics, limiting its use to softer materials.
- May require some practice to achieve perfectly clean cuts on thicker or more flexible materials.
- Blade replacement can be slightly tricky for first-time users without instructions.
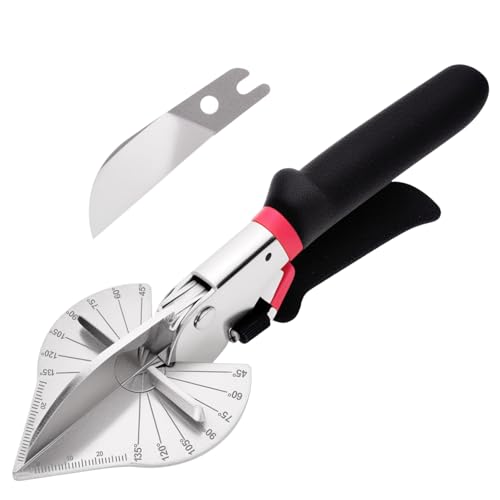
The GARTOL Miter Shears are a specialized hand tool designed for making clean, angled cuts on soft materials like PVC trim, molding, quarter round, and softwood. This tool is best suited for DIY homeowners, woodworkers, and hobbyists who frequently work on light-duty cutting projects for home repairs, crafts, or model building. It is not intended for heavy-duty construction or cutting metal or hardwood, so professionals tackling tough materials should look elsewhere.
In real-world use, the shears deliver decent cutting efficiency on materials within their intended range. The adjustable angle scale, which goes from 45 to 135 degrees, allows you to set precise miter cuts for trim and molding, making it handy for creating clean joints. The engraved scale is clear and easy to read, and the sliding marker helps you lock in the angle without guesswork. However, the cutting action can feel a bit stiff on thicker materials, and achieving a perfectly straight cut may require some practice and steady hand pressure.
Build quality is decent for the price point. The body is made from aluminum alloy, which keeps the tool lightweight while providing enough strength for light cutting tasks. The handle features a PPC anti-skid cover that offers a comfortable, secure grip, reducing hand fatigue during repetitive cuts. The safety lock is a nice touch, preventing accidental blade exposure when the tool is stored or not in use. The included two replacement blades add to the tool's longevity, though swapping them out can be a bit fiddly without clear instructions.
Storage and maintenance are straightforward. The shears are compact enough to fit in a standard toolbox or workshop drawer, and the safety lock ensures they stay closed and protected. No special maintenance is needed beyond keeping the blades clean and dry to prevent rust. The tool is not designed for heavy use, so occasional blade replacement and basic care should keep it functional for years of light-duty projects.
A realistic limitation is that this tool is strictly for soft materials. If you need to cut hardwood, metal, or dense plastics, you will need a different tool. Also, the cutting capacity is limited to thinner materials, so thicker moldings may require multiple passes or alternative methods. For DIYers and hobbyists who work with PVC, trim, rubber, or leather, these shears are a practical and affordable addition to the workshop. For professionals needing higher cutting capacity and durability, a more robust miter saw or shear would be a better investment.
Overall, the GARTOL Miter Shears are a solid choice for light-duty cutting tasks around the home or workshop. They offer good precision for angled cuts, a comfortable grip, and include spare blades for added value. If your projects involve soft materials and you value accuracy and ease of use, this tool is worth considering. Just be mindful of its limitations and choose accordingly.

Pros
- Quick angle changes with positive click stops for 0, 22.5, and 45 degrees
- Sharp, durable SK5 blade that stays sharp through many cuts on soft materials
- Lightweight and well-balanced for comfortable one-handed operation
- Includes a spare blade and blade sheath for convenience and safety
Cons
- Not suitable for cutting metal or thick materials; limited to light trims and moldings
- Some users may find the cutting capacity insufficient for larger baseboards or crown moldings
- Angle adjustment mechanism may require occasional tightening to maintain precision over time
The O'Shine 22.5 Degree Miter Shear is a specialized hand tool designed for making precise angular cuts in small trim pieces like quarter rounds, shoe moldings, balsa wood, PVC strips, and other light materials. It's a practical addition to any workshop or garage where quick, clean cuts are needed without the noise and setup time of a power miter saw.
This shear is best suited for DIY homeowners tackling baseboard or crown molding projects, woodworkers crafting detailed pieces, contractors installing trim, and anyone who regularly works with small moldings or craft materials. Its ability to cut at 0, 22.5, and 45 degrees covers the most common angles for joining pieces or fitting around corners, making it a versatile tool for a variety of tasks.
In terms of performance, the SK5 steel blade is sharp out of the box and holds its edge well through dozens of cuts on soft woods and plastics. The heat-treated chrome plating adds corrosion resistance and reduces friction, allowing for smoother cuts. The angle adjustment is straightforward: you simply align the fence to the desired marking and it clicks into place, providing repeatable accuracy without guesswork. The lightweight aluminum alloy construction keeps the tool stable during use but easy to handle for extended periods.
Build quality is solid for a tool in this price range. The anvil and fence are made from high-quality aluminum, and the blade is securely mounted. The PVC handle offers a good grip even with sweaty or gloved hands, reducing fatigue during repetitive cutting. The included extra blade and protective sheath are thoughtful additions that add value and extend the tool's useful life.
Setup and maintenance are minimal. The shear requires no batteries or cords, and the blade change process is simple with the provided sheath to protect your fingers. Storage is easy thanks to its compact size - it fits in a standard toolbox drawer or on a pegboard hook. One realistic limitation is that this tool is not designed for heavy-duty work; it won't cut metal or thick hardwood. Users needing to cut larger trim pieces or tougher materials will still need a miter saw or power shear.
Overall, the O'Shine 22.5 Degree Miter Shear is a reliable, affordable choice for anyone who frequently works with small trim and molding. It delivers clean cuts, quick angle changes, and comfortable operation in a compact package. For DIYers and professionals alike, it's a handy tool that can save time and reduce waste on finishing projects.
Pros
- Adjustable angle range covers common trim cutting needs.
- Sharp blade cuts cleanly through soft wood and PVC.
- Comfortable handle for extended use.
- Safety lock adds peace of mind.
- Extra blade included increases value.
Cons
- Not suitable for cutting metal or hard woods.
- Angle adjustment can require careful fine-tuning to get precise cuts.
- Limited to cutting thin materials up to about 1/4 inch thickness.
The BECOMFY Multi Angle Miter Shear is a handy hand tool designed for cutting soft materials like quarter round, shoe molding, picture frame molding, PVC strips, and other light trim work. It is best suited for DIY homeowners tackling home improvement projects, woodworkers working on small moldings, and contractors who need a quick, portable cutting solution without dragging out a miter saw.
In terms of real-world performance, this shear excels at making clean, precise cuts in soft wood and plastics. The adjustable angle slider lets you set cuts anywhere from 45 to 135 degrees, which covers most common trim angles. For anyone doing crown molding or baseboard quarter rounds, this tool can save time and reduce setup hassle. It works well for light-duty trimming, and the sharp SK5 blade provides decent cutting efficiency for its size.
Build quality is a mix of practical materials. The blade is made from SK5 steel, which holds an edge well for repetitive cuts. The handle is aluminum alloy with a PVC anti-slip cover, offering a comfortable and secure grip even during extended use. The turn clasp lock is a nice safety feature that keeps the blade closed when not in use, preventing accidental cuts. Overall, the construction feels solid for a tool in this price range.
Setup and use are straightforward: there is no assembly required. Just unlock the clasp, adjust the angle, and squeeze to cut. Storage is easy since the shear is compact enough to fit in a standard toolbox drawer or hang on a pegboard. Maintenance involves occasional blade replacement, and the included extra blade ensures you can keep working without an immediate trip to the store.
Realistic limitations include the inability to cut metal or dense hardwoods, and the maximum cutting thickness is limited to thinner materials (roughly 1/4 inch or less). The angle adjustment mechanism can be a bit fiddly to set precisely, and some users might prefer a lockable dial instead of a slider. Also, for high-volume professional use, a power miter saw would be faster. But for occasional trim work, this shear is a practical choice.
Overall, the BECOMFY Multi Angle Miter Shear offers good value for DIY homeowners, woodworkers, and light contractors who need a portable, safe, and adjustable cutting tool for soft trim materials. It is affordable, comes with a spare blade, and works well for small projects around the house or workshop. If you often cut quarter round or PVC molding, this tool is a worthwhile addition to your kit.

Pros
- Eliminates the setup time and sawdust mess of pulling out an electric miter saw for minor trim work
- Clearly engraved angle plate makes setting cuts between 45 and 135 degrees fast and repeatable
- Comes with spare SK5 blades for easy replacement when cutting edges eventually wear
- Compact and lightweight build fits easily into a basic tool pouch, bucket organizer, or trim apron
Cons
- Restricted to materials up to 0.4 inches thick and unsuitable for dense hardwoods or metal
- Requires firm hand grip strength that may become tiring during extensive whole-house installations
The Warmtree Multi-Angle Miter Shear is a specialized manual cutting tool engineered to produce clean, angled cuts on molding and decorative trim. Unlike traditional saws that generate fine sawdust and require clearing floor space, this hand tool operates like an oversized pair of heavy-duty shears with a built-in miter guide. It is designed specifically for DIY homeowners, finish carpenters, flooring contractors, and workshop hobbyists who need to make rapid joint cuts on smaller stock.
Equipped with a high-carbon SK5 steel blade, the tool slices cleanly through softwoods such as pine, as well as vinyl trim, PVC wire trunking, chamfer strips, and rubber weatherstripping. The adjustable fence features clearly marked angle detents ranging from 45 to 135 degrees. Users simply align the stock against the fence, set the target angle, and squeeze the handles to produce a clean joint. Placing the workpiece closer to the rear pivot point optimizes mechanical leverage, resulting in smoother cuts with minimal tearing.
In terms of construction, the shears utilize a solid metal frame paired with non-slip, rubberized grips. The ergonomic handle contours help distribute pressure evenly across the palm, preventing sore spots during repetitive trim installations. When the task is complete, a thumb-operated safety lock secures the blade in the closed position, protecting both the cutting edge and hands during storage inside a toolbox or tool bag.
Prospective buyers should keep material limitations in mind. The maximum recommended cutting thickness is 0.4 inches, which easily accommodates standard quarter round and shoe molding but excludes larger baseboards or door casing. The blade is strictly intended for soft materials and plastics; attempting to cut through dense hardwoods like oak, MDF with hard coatings, or metal components will dull or chip the blade edge.
For small-scale home improvement tasks, baseboard shoe molding repairs, and crafts, this manual miter cutter offers significant practical utility. Routine maintenance simply involves wiping the blade clean of adhesive residue or sap and switching out the blade using the provided replacements when dullness occurs. It stands out as an affordable, time-saving addition to any portable finish carpentry kit.
Setting up an electric chop saw, running extension cords, and sweeping up sawdust can consume more time than installing the trim itself. These miter shears solve that problem by allowing users to make cut adjustments right at the installation point. Whether working on tight closet corners or running shoe molding along a hallway, adjustments happen instantly without walking back and forth to a cutting station.
The quiet, dustless operation is particularly beneficial when working in occupied residences where noise and airborne particles must be kept to a minimum. For remodelers handling punch-list items or homeowners finishing weekend flooring projects, the tool delivers the exact portability needed for quick, professional results.
Mastering Quarter Round Cuts on the Jobsite and in the Workshop
Quarter round trim features a profile with two flat edges meeting at a ninety-degree angle and a continuous convex curve along the visible front face. Cutting this specific profile accurately on an electric miter saw demands a consistent working method, because flipping the trim upside down or leaning it unpredictably against the fence instantly distorts joint alignment. Whether trimming out a newly laid hardwood floor, hiding expansion gaps around floating laminate planks, or updating painted baseboards, mastering joint geometry eliminates hours of corrective sanding and filling.
Profile Orientation and Wall-to-Floor Reference Alignment
The foundation of cutting quarter round cleanly is maintaining identical workpiece orientation on the saw bed throughout your entire project. One flat edge rests firmly against the horizontal saw table, while the adjacent flat edge sits flush against the vertical saw fence. This setup mirrors exactly how the trim rests against the floor and baseboard in your finished room. If you roll or tilt the profile forward even slightly during the cut, the resulting miter angle will wander off true vertical, creating visible gaps at the top or bottom of your corners.
Professional trim installers often mark the back or bottom of their stock with a faint pencil line to prevent accidental orientation errors when working quickly. Because quarter round is symmetrical in width and height, turning a piece upside down might seem harmless, but slight manufacturing variances can cause noticeable seam mismatches. Consistent placement ensures that the curved face maintains uniform projection along the entire perimeter of the room. Always verify that neither sawdust buildup nor tool guards push the narrow workpiece away from the fence before triggering the saw.
Preparing the Power Miter Saw for Delicate Trim Work
Standard framing blades with low tooth counts tear through delicate softwood and composite trim, producing splintered edges and severe blowout on back cuts. For pristine cuts on small profile moulding, install a finish blade equipped with sixty to eighty carbide-tipped teeth on a ten-inch saw, or eighty to one hundred teeth on a twelve-inch model. High tooth counts reduce cut aggression, slice through delicate fibers smoothly, and leave joint surfaces that require little to no sanding before assembly.
A zero-clearance throat plate or an auxiliary wood fence attached to your saw provides vital support beneath and behind fragile quarter round pieces. The wide throat slot found on factory saw tables easily swallows small offcuts, leading to violent kickback, splintering, or damaged trim. Clamping a flat piece of scrap plywood or medium-density fiberboard to the fence and making a scoring pass creates an exact zero-clearance backer. This simple preparation step stabilizes narrow stock, preserves crisp cut lines, and prevents severed offcuts from being dragged into the spinning blade cavity.
Executing Inside Corner Miters Accurately
Inside corners represent the vast majority of joints encountered in any room, joining two walls meeting at an approximate ninety-degree angle. To cut the left-hand piece of an inside corner, swing your miter saw table forty-five degrees to the right. Place the trim with its bottom flat edge on the saw table and its back flat edge against the fence, keeping the measuring mark aligned with the blade kerf. The long point of this miter cut will sit against the back fence, while the short point tapers toward the room.
To cut the adjoining right-hand piece, rotate the saw table forty-five degrees to the left while keeping the moulding oriented in the exact same upright posture against the fence. Holding the workpiece firmly against both reference surfaces prevents the spinning blade from lifting or twisting the flexible wood strip. After cutting, dry-fit both components in the corner to confirm joint tightness before fastening them with finish nails. In rooms with drywall mud buildup in the lower corners, you may need to adjust your miter table to forty-four or forty-six degrees to achieve a seamless face fit.
Cutting Outside Corner Miters Without Splintering
Outside corners occur where walls turn outward around hallways, kitchen islands, and partition bulkheads, leaving the joint completely exposed to direct view. Because outside corners receive close scrutiny and frequent foot traffic, joint precision here is critical. For an outside corner, the angle cuts are reversed relative to the workpiece length: the long point of the miter cut appears on the front curved face, while the short point rests against the back wall. Cut the left piece by setting the miter saw table forty-five degrees to the left, and cut the right piece with the saw set forty-five degrees to the right.
Marking outside corners directly in place on the wall yields much higher accuracy than measuring with a flexible tape. Hold the piece in position along the baseboard, allow it to run past the corner corner bead, and score the exact corner location with a sharp utility knife on the bottom edge. Transferring this knife line to your saw ensures precise blade alignment without tape-stretch discrepancies. If you are comparing workshop tools for broader cabinetry or long rip cuts, reviewing how a table saw is used for trim provides insight into complementary workshop workflows for wider stock.
Joining Long Runs With Angled Scarf Joints
When trimming a room perimeter that exceeds the standard eight-foot or twelve-foot length of single trim boards, you must splice pieces together seamlessly. Butt joints, where two square ends meet flatly, are notoriously difficult to hide and frequently separate over time due to seasonal humidity changes. Professional carpenters always join straight runs using an angled overlap known as a scarf joint. A scarf joint distributes the seam over a longer surface area and creates an almost invisible transition once glued, nailed, and painted.
To create a scarf joint, set your miter saw table to forty-five degrees and bevel neither direction, maintaining a standard miter angle cut. Cut the terminating end of the first board so the miter tapers toward the wall face, creating a welcoming ramp. The mating board receives a complementary forty-five-degree cut that overlaps over top of the first piece in the direction of the room’s sightline. Applying a thin dab of wood glue along the overlapping miter faces and pinning the joint directly into the baseboard holds the pieces flush and prevents future seasonal shifting.
Crafting Clean End Returns on Open Baseboards
When quarter round terminates against door casings, open wall corners, or floor transitions, leaving an exposed end grain looks unfinished and unappealing. An end return solves this problem by turning the moulding profile ninety degrees back into the baseboard or casing, concealing the raw cut wood entirely. Creating an end return requires cutting a standard outside miter on the main running strip where it reaches the end point. Then, a tiny wedge-shaped scrap cut with a matching opposite miter fills the corner return back to the wall.
Because the return piece is extraordinarily small, cutting it safely on a powerful electric miter saw requires caution and deliberate workholding techniques. Never hold a half-inch wooden offcut with your bare fingers near a spinning circular blade. Instead, cut the miter on the end of a longer board, slice off the tiny return piece, and allow the blade to come to a complete stop before retrieving the scrap with pencil or pliers. Fastening the tiny return using quick-setting cyanoacrylate glue with an aerosol activator creates a durable, professional end cap in seconds.
Essential Workholding and Safety Rules for Small Moulding
The compact physical size of quarter round presents unique hazards during power saw operation. Operators frequently make the mistake of placing their hands inside the manufacturer-specified six-inch danger zone around the saw blade to control the narrow stock. Because the spinning blade teeth can grab small, lightweight wood pieces and fling them toward the operator, proper workholding devices are mandatory. Use a wooden push stick or a hold-down clamp designed for finish carpentry to secure small workpieces firmly against the fence.
Always bring the saw blade up to full operating speed before lowering it into the trim piece, and feed the blade downward with slow, deliberate pressure. Chopping down quickly can fracture thin moulding, blow out back fibers, or pull the workpiece out of alignment. Once the cut is completed through the stock, hold the saw head down and release the trigger switch, allowing the motor brake to stop the blade completely before raising it. Raising a spinning blade through freshly severed trim pieces often catches the offcut and throws it violently across the room.
Evaluating Hand Miter Shears as a Jobsite Alternative
While an electric miter saw offers rigid power, setting up a heavy station indoors generates airborne wood dust and requires continuous walking back and forth to an exterior staging area. For lightweight materials, dedicated hand miter shears serve as a highly portable, quiet, and dust-free alternative for shoe moulding and quarter round. Tools like the GARTOL Miter Shears- Multifunctional Trunking provide an adjustable cutting slider on an engraved scale from 45 to 135 degrees. These manual cutters slice cleanly through pine, basswood, PVC, rubber, and light vinyl trim without requiring power cords or dust collection bags.
Specialized angle needs also benefit from dedicated manual cutters designed for specific corner geometries. The O’Shine 22.5 Degree Miter Shears For Angular cutting features designated detents for zero, twenty-two and a half, and forty-five degrees using a hardened Japanese SK5 steel blade. This twenty-two and a half degree capability proves exceptionally handy when wrapping octagonal bump-outs, bay window corners, or constructing segmented transitions without recalibrating a heavy saw. When selecting manual shears, keep in mind that they are designed specifically for softwoods, plastic, and PVC, rather than dense hardwoods like oak or maple.
Budget-friendly alternatives such as the Multi Angle Miter Shears for Moulding and Trim from BECOMFY and the Miter Shears for Wood Trim Molding from warmtree provide reliable jobsite utility with replaceable high-carbon blades. The warmtree cutter features a non-slip rubberized grip and an adjustable fence clicking between standard angles, providing cutting capacity up to four-tenths of an inch. For quick residential punch-list projects, keeping a set of quality miter shears directly on your tool belt eliminates endless trips to the garage saw station, speeding up installation substantially while preserving crisp joint lines.
Troubleshooting Corner Gaps and Out-of-Square Walls
Drywall corners in residential homes are notoriously imperfect, rarely forming an exact ninety-degree right angle due to heavy coats of joint compound near the floor. If you cut your quarter round strictly at forty-five degrees, you will frequently observe unsightly gaps opening at either the front apex or back heel of the joint. You can quickly measure the true corner angle using an inexpensive plastic angle finder or bevel gauge placed directly against the baseboards. Dividing that actual angle measurement in half gives you the precise miter setting required on your saw table.
Always maintain a small box of scrap quarter round cutoffs on hand to test miter angles before making final cuts on full-length trim pieces. Test fitting two short eight-inch scraps in the actual room corner reveals immediately whether the joint requires a forty-four or forty-six-degree compensation. If minor gaps remain on painted woodwork, high-quality painter’s acrylic caulk easily bridges small seams, whereas stained hardwood trim demands tight wood-to-wood contact reinforced with tinted wood putty. Taking the extra minute to verify corner angles ensures crisp, tight transitions that look exceptional throughout the completed room.




Write Your Review
No reviews yet. Be the first to share your experience!